


FAQs
-
During the initial consult, the MedHawk Pools’ sales team will meet with you at your home, capture your vision for the project, answer any questions, and take measurements / pictures for the design team. We provide a Calendly link for you to schedule a design review that fits around your schedule.
At the design review, you will come to the MedHawk Pools Design Center located North of Celina High School to review the conceptual drawing. The house & terrain will be modeled up to represent your current situation, and the pool / outdoor living space will be ready for review.
This meeting is very collaborative as we discuss the use of the space, empowering conversation areas, and considering alternate configurations. It is fun to move the spa, flip the pool around, organize the appliances, and drop in some landscaping to create the perfect outdoor space.
Once we have the design mastered, the Sales Team will provide an interactive quote so you can change the number of lights, prioritize features, and fine tune the quote to meet your budget objective.
-
The MedHawk Sales team makes every effort to reach out the next business day to setup an appointment for your initial consultation.
If your request has not been acknowledged by the team, please reach out by phone at 833-633-4295 so we can take care of your needs.
As much as we love technology, we wouldn’t want to miss your message due to a spam filter.
-
The process to schedule an initial consultation, visit your home, model the yard, and meet for a design review usually takes 1-2 weeks to coordinate schedules.
-
We have an amazing source on our website that includes informational videos that show each step of our construction process. In projects > Construction
1) Contact and Consult - simply contacting us and letting us serve you with your visions and desires. We send our one of our professionals to your home to discuss your project ideas and see your potential workspace!
2) Design and review - once deciding to move forward, we would then begin to design your own personal design with the specifications that you provide! Envisioning your dream will become physical 3D custom render of how your future project will look at your home. At this stage, we will meet and go over your design and anything + everything is able to be reviewed if desired! We are here for you, our goal is for you to be completely satisfied and motivated!
3) Materials Selection - at this stage we usually combine with the design review (#2). You get to chose ALL material that you envision: tile, coping, plaster, decking, and ledge stone! We have a great selection to choose from, or if you have your own wants for material then we will try to accommodate those!
4) Excavation - our construction process begins with breaking ground, starting with excavation. At MedHawk, we have top-of-line machinery to form and dig to any backyard requirements. We map out the pool and draft up a set of plans that lay out the scope of the project, that way our crew knows precisely where to start digging. We remove and haul out all dirt and debris for every job that we excavate, keeping things as simple as possible for each of our customers.
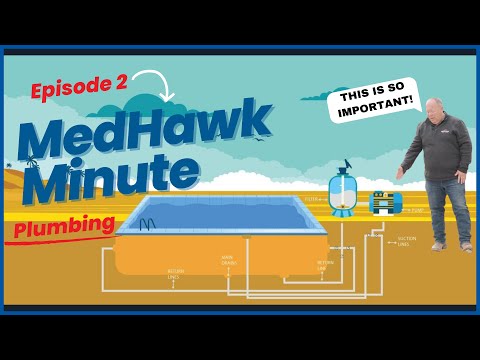
5) Plumbing and rebar - Rebar is very important in giving swimming pools their shape and core strength, without it, the pool would crumble and fail, resulting in a total loss. Similar to bones and a sine for us humans - rebar is the same concept, keeping everything together and in tact. Rebar also helps form the design of the overall pool such as the steps, benches, and sun shelves. After the rebar is in, we move on to the plumbing. This stage is also vital in pool building. It is what allows the water to be directed to the equipment pad where it is filtered, cleaned, and sometimes heated before being pumped back into the pool. Plumbing is installed for spa jets, pool lights, fountains, water features, and even to run gas and electrical to built in kitchens and outdoor structures.
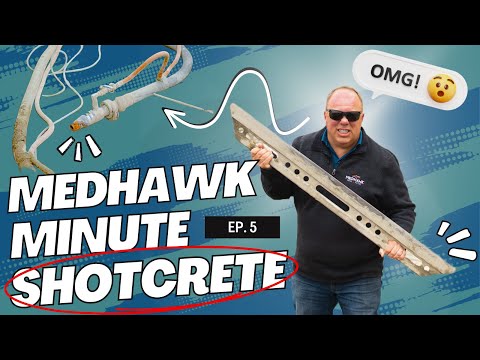
6) Gunite - This part of the process is where cement, sand, and water are mixed and shot through a high-pressured nozzle onto every square inch of the pool; to create a strong shell, there can be no empty spaces between the gunite, rebar, and dirt. Similar to how a home gets its structure and strength from a concrete foundation, the gunite is what forms the structure of the pool. As one person is shooting, other team members will be busy troweling the surface of the wet gunite to form the steps, benches, and ledges according to the design. After is it finished, the gunite will have to cure and be watered down with a hose or sprinkler 2x a day for 5 days, this is what strengthens the shell of the pool. It is a messy process but this is where a dirt hole in ground begins to shape into something amazing!
7) Masonry - The masonry step is where the uniqueness of each project begins to shine! The gunite shell is still rough so our Masons work hard to smooth the surface of the gunite in a process called “browning-out”, and then expertly apply the selected tile, coping, or ledgestone. With so many options and combinations of materials, this stage in the build highlights the specific style of each homeowner!
8) Decking - Pool decking frames the outside of the pool, and allows for a clean walkway to the water; this helps the pool to not be filled with dirt and debris. There are many different styles of decking, including classic brushed concrete, slip-resistant Spray Deck, and even pavers. With so many decking options and textures, there is something to fit every unique pool aesthetic.
9) Turf - At this stage we begin to close out the pool building process and with turf (optional), your yard begins to come back to life - looking better than before. Turf is a synthetic grass that comes in rolls which needs to have hard and sound under layers. Sand and other rock materials need to be leveled and smooth for the turf to be just right. One simple bump or rock underneath the synthetic grass could seriously hurt someone!
The turf is put in place with special nails, material, and glue. Turf is great for any backyard, comes with low maintenance compared to real grass, and stays green all year long!
10) Plaster - Lastly, plaster. This is one of the closing stages of building a beautiful custom pool from MedHawk. Plaster covers the gunite and adds another layer of strength and protection to the surface of the pool as well as adding color and life to the overall project. Once plaster is applied, the pool can be filled with water. There are many colors and textures of plaster to choose from and each one affects the shade of the water, from cool blue, to tropical teal, and even dark navy. We also offer mix-ins such as abalone shell and glass beads that can be added to the plaster for clients who want a bit more “sparkle” in their pool. Our men are high professionals with years of experience in applying plaster quickly and effectively, this ensures that we are able to get the new pool filled with fresh clean water as soon as possible!
-
Depending on the season, weather, size of the project, any speed bumps along the way, and if all materials chosen are in stock we strive to finish all projects in 90 working days! This excludes holidays, weekends, harsh weather, and permits. Start to finish average is about 6 months - this is not exact and varies with every project.
-
As soon the contact form is filled out, one of our team members will reach out and speak with you immediately - during office hours! If contact is made outside our hours (M-F, 9-5pm) or on a holiday/weekend, we try to make a phone call within 24-48 hours!
Once we call you, we will set up a consult with one of our professionals to go over all the details and specs at your home.
Post consult, we then begin to design your vision with our innovative pool software! The lead times are usually about a week from scratch to presentable design, at this stage you will be working closely with one of our designers.
Following, the designer(s) will set up and present the design of your project - at this time any questions, changes, and material sections will be done!
Finally, once we start building - a project manager will work closely with you on all the processes of building your amazing project!
All schedule and other questions will be answered though our app called ‘Builder Trend’ which will be very usually throughout the process.
-
We strive to build the best possible pools for each and every customer. We would never cut corners and/or offer products that we do not back. We also partner with Hayward Products and PAL Lighting - which are top-of-the-line that are very reputable.
We will install other known and reasonable brands that we know are reputable. Unfortunately, we will not install anything/everything - the pools we build are a reflection on the quality represented by MedHawk.
-
We recommend Hayward Products as the highest standard in the pool industry. Robotic cleaners are definitely worth the investment as they clean automatically and even climb walls to clean them! Depending on budget, a standard pressure side pool cleaner that connects directly to the pool filter will do the job.
There are many different brands and products out there - paying a little more is worth it for the quality which protects your investment.
-
There are three main sanitation methods:
▪ Chlorine - the most common & proven sanitation method used in residential swimming pools today. It can be found in many forms such as liquid or tablets. When the pool is properly cleaned, it requires very little chlorine to maintain a healthy swimming environment.
▪ Salt pools - while widely thought of as being chlorine-free, actually create chlorine through a process called electrolysis. When power is passed through the water, hypochlorous acid is formed from salt and water. The salt cell is a popular upgrade because the water feels softer.
▪ Ozone/UV sanitation - 100x stronger than chlorine and requires much less PH balance. Ozone/UV is often used to augment chlorine or salt pools and reduces overall maintenance & chlorine requirement.
-
As follows, these are the main hidden costs that we want to be transparent about:
ROCK EXCAVATION
North Dallas soil is a consistent mix of clay, fill dirt, or solid rock. Older homes tend to be located closer to rock and new homes are often located on clay soil due to advances in concrete foundation technologies. Ask your neighbors with pools about soil conditions and be prepared for additional rock fees.
CAVE IN
Loose fill dirt and dry clay soils may collapse during the excavation process. Previously excavated dirt near a retaining wall is especially susceptible to cave-ins. While MedHawk Pools strives to move from excavation to the gunite phase quickly, cave-ins are a possibility in the North Dallas area.
MUCK OUT
Clay soil reacts to water like a sponge. When the soil is dry, it crumbles and retracts from the foundation, but when the soil gets wet, it expands and takes the path of least resistance.
After excavation, it is easier for saturated soil to expand out than up, causing mud to slide into the pool and stick to the rebar.
LANDSCAPE
Pool excavation extends beyond the shape of the pool. Trenches for plumbing and electrical may cause damage to the side & front yards as well. Restoring the yard after excavation is an expensive process, and some builders charge up to $10/ft for the final grade, drainage swell, and sod repair.
FENCE
Fence panels are typically removed during the excavation process and reinstalled during the yard restoration process. Aging fence panels may not survive the move and may need to be replaced. In addition, the gate latch must be moved higher than normal to comply with local child safety regulations.
HYDRATE
Sprinkler zones are tied to a main water line that runs in around the property. These pipes and control wires will be damaged during the excavation process, and a full sprinkler reroute will be required at the end of the project. Additional zones and drip lines may be required depending on the landscape design.
DRAIN
Texas rain pours like buckets from heaven and quickly overwhelms residential drainage.
Surface drainage between homes is preferred because it can handle large quantities of water. It is important to properly grade out the surface drainage and install drain pipes during the restoration process.
-
They are not illegal but they are a lengthy process, which requires time and a little extra money.
Auto-fills are similar to how a toilet works with their ‘fill method,’ once the water hits a threshold for the bobber, the water simply stops filling.
Similar to a pool auto-fill, although more is requires - of course. First, an rpm valve and heated enclosure box is required, it must initially be inspected by the city, pass a water flow test, and annually be inspect by the home owner and a certified tester.
This is definitely achievable, it is a few extra steps that the owner needs to be aware of, but standard do not come with our pools.
-
DE filters are not required by the city. Traditionally cartridge filters are the ‘way to go’ as they are easier and faster to change out for most owners.
Learn more HERE about DE filters!
-
During each major step in the building process - (Excavation, gunite, masonry, and plaster) we require ‘pre-’ payments prior to that stage beginning - which ranges from 25%-35%. Then once that stage is complete the reminder payment will be required to proceed.